1. Programming #
#
When creating a program as a client admin, you should consider the following
- How many clinics or independent groups are participating?
- Who and how many staff members are associated with each clinic or group?
- What are the patient diagnoses and how will they be attended?
- What medical devices and how many medical devices are required?
#
- Create a health program (optional)
- Create organizations and/or sub-organizations
- Create profiles for Practitioners, Nurses, and Care Managers
- Assign Practitioners, Nurses and Care Managers to their appropriate organizations
- Inform and Instruct nurses to create patient profile
- Register and assign medical devices to the appropriate patients
2. Clients #
#
As a Client Admin, you can manage your clients. An example of a client would be Crimson Healthcare. Under a client, would be organizations which operate separately. In order to Manage Clients, follow these steps –
- Click Clients > Manage Clients
- Under the Manage Clients page, you can see all the clients under you. To edit, click on the vertical ellipses (…) on the right side of the screen
- Under Edit Client, you can update settings such as Address, Phone Number, URL Extension, Language, Currency, Theme, and numerous site images including Logo
- Under Payment Statements, you can see your Invoices, add Credit Cards and Banks, and make Payments
- Under Client Thresholds, you can update thresholds for you client. This means that all organizations and sub-organizations will automatically start off at these thresholds, but these thresholds can be adjusted on the organization level, provider level, and patient level
- Under Client Alerts, you can manage alerts. You have options to enable various alerts, choose how you get alerted (Email, SecureMail, Text, etc) and choose who the alerts are intended for (All, Patients, Providers, CSRs)
3. Organizations #
#
An organization is a group of users operating separately from another independent group. An example would be clinic which has three different branches operating under it. In this situation, the primary or main branch would be setup as the main organization and each of the independent clinic branches would be set-up as sub-organizations under the main branch. Organizations branches could go deep as many levels as you would like.
Make sure to be careful when setting up organizations as it very important to consider the hierarchical structure when creating the organizations. One sub-branch organization will not be able to access information in another organization.
#
- On the left-hand side menu, click Organization > Manage Organization
- From the Manage Organizations page, click on + Create Organization on the top right
- Enter the appropriate information on the Create an Organization page. All required fields will be marked with a red asterisk. For sub-organization, make sure to choose the correct Parent Organization. This is crucial for organizational hierarchy
NOTE: The correct Parent Organization must be entered to prevent unauthorized access of users to separate branches which should not have access
#
- On the left-handed side menu, click Organizations > Manage Organization
- Under the Manage Organization page, you can see all the organizations under you. To edit, click on the vertical ellipses (…)
- When clicking on the ellipses, a drop-down menu will open. From here you have access to Edit Organization(information), Assign Users, access Organization Notes, Assign Medical Kits, input Consent Forms, set Organizational Rules and set Notification Preferences
#
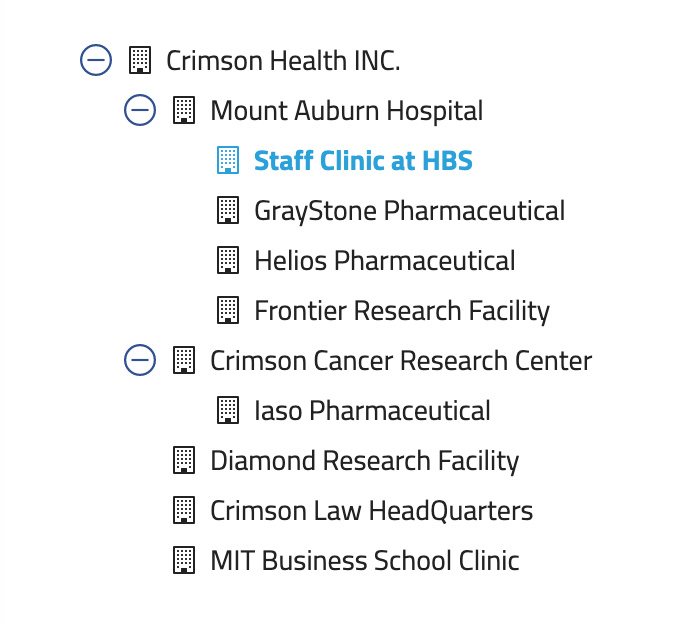
- On the left-hand side menu, click Organization > Organizational Structure
- To see the full organizational structure, click the “+” for all parent organizations
- Once clicking on a specific organization (i.e. Staff Clinic at HBS), you can see Organization Details such as Name and Description. You can also see all Active Users under the organization, including Practitioners, Nurses, and Patients
4. Practitioner and Nurse user profile #
#
- On the left-hand side menu, click Users > Manage Users
- Under the Manage Users page, click + Create User on the top right-side of page
- Input appropriate information under Create New User. All required information will be marked with a red asterisk. Make sure the correct User Type is inputted
- After entering information, scroll down to click Create User. At this point, the user is created.
#
- On the left-hand side menu, click Users > Manage Users
- Under the Manage Users page, you can see all users added under your organization(s) and information such as User Types, DOB, Client and Address
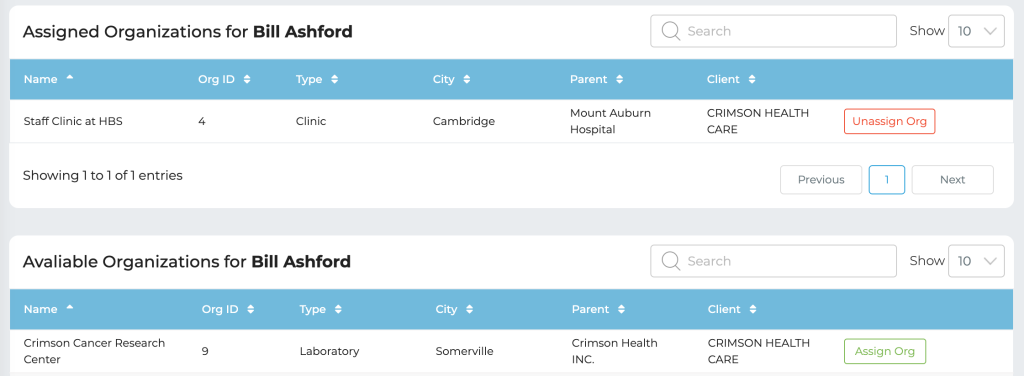
- To edit a specific user, click the vertical ellipses (…) in the same row as said user
- On the dropdown menu, click on Assign Organization
- From here, you can see Assigned Organizations and Available Organizations for said user. Simply scroll down until you see the organization which you this user to be assigned to. Click on the Assign Organization button in the same row as the organization which you want to assign.
#
- On the left-hand side menu, click Users > Manage Users
- Under the Manage Users page, click on the vertical ellipses (…) in the same row as the user you wish to edit
- To update user information, click on Edit User from the drop-down menu. From here you can edit information such as Email, Address, Phone Number, Company Name, License Number, Smoking Status and more. When done editing, scroll down and click on Update User.
#
- In order to prevent access to former staff members, their user accounts need to be inactivated
- On the left-hand side menu, click on Users > Manage Users
- Under the Manage Users page, click on the vertical ellipses (…) in the same row as the user you wish to inactivate
- To inactivate a user, simply click the red highlighted Inactivate User button from the drop down menu
- To monitor who is Activated or Inactivated, you can toggle between Active and Inactive under the Manage Users page to the immediate right of the left-hand side menu
#
- On the left-hand side menu, click on Users > Manage Users
- Under the Manage Users page, click on the Inactive button in between Active and Export
- Under the Inactive page, click on the vertical ellipses (…) in the same row as the user you want to activate
- To activate a user, simply click on the Activate User button highlighted in lime green
5. Communications #
#
For sensitive information, we built our own HIPAA compliant email system into our ecosystem called Secure Mail. To compose an email –
- On the left-hand side menu, click More > Secure Mail
- From here, you can Compose, see you Inbox, Sent Mail, etc
- Click on Compose, choose who it’s to, the subject matter and the message
- Once complete, scroll down to click on Send Message
If you want to send out a Chat or Text, the process is nearly identical. Instead of going to My Messages > Secure Mail, go to Messages > Text or Messages > Chat. Find the patient and your previous chat or text history will show. Simply enter in your message and click Send.
NOTE: Chats stay in the platform. Texts will stay in the platform and will send to the mobile device as well.
#
There are two ways to send out a phone call to a patient. First method –
- On the left-hand side menu, click Patients
- Find the patient you want to call. In the same row, it will show their phone number under the column Mobile.
- Click the phone icon next to their phone number, then click Call
Second Method
- On the left-hand side menu, click My Messages > Phone Calls
- There will be a Mobile Number, Office Number and Home options
- Click on phone icon and then click Call
6. Video Consultation Scheduling #
#
- On the left-hand side menu, click More > Video Consultations
- Click the Create a New Event blue button at the top right of the screen
- Enter information such as Patient, Practitioner (Practitioners), and see what availability the practitioner has
- Scroll down and click Schedule Video Consultation. The event has now been created
NOTE: As a client admin, you will not be able to set up your availability. Instead, availability will be set up at the practitioner level. First, you will need the practitioner to schedule their availability, then you will be able to schedule a video consultation.
#
- On the left-hand side menu, click More > Personal Events
- Click the Create a New Event blue button at the top right of the screen
- Enter the Dates, whether the event repeats and how often, Subject, Reminders and Description
- Scroll down and click Create Event. The event has now been created
7. Devices #
#
A medical kit is a device management function to provide tracking of items owned by the company, assigned to patients, staff or another office.
Medical kits can be a group (or assembly) of several properties or devices.,
If the Organization is providing the devices, it is advisable that a set of medical devices be defined and assembled as a Medical Kit prior to assignment to patients. This makes it easier to transfer the set between patients as well as managing your inventory.
For BYOD programs, devices can be directly assigned to patients without pairing them as medical kits.
#
Devices refer to all medical or commercial grade biometric devices used by patients to monitor their vitals.
Devices can be owned by Hifinite, clients, or patients. For BYOD (bring your own device) programs, devices should directly be assigned to patients without pairing them as Assets
#
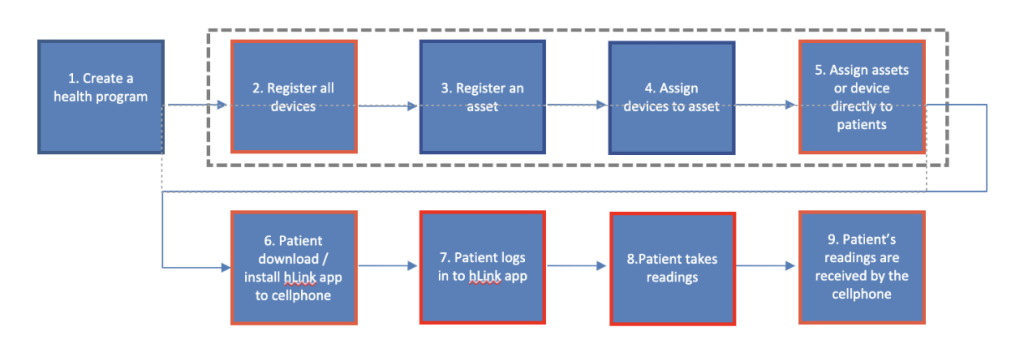
The steps in managing devices are shown in the flow diagram below:
#
First, you need to define the device model in the system.
- On the left-hand side menu, click Devices > Manage Devices
- On the Manage Devices page, click on the Add Device Model page. Required information is marked with a red asterisk sign
- After entering appropriate information, scroll down and click Create a Device Model button to save.
Then, you can register the device in the system
- On the left-hand side menu, click Devices > Manage Devices
- On the Manage Devices page, click on + Create Device
- Enter the previously created Device Model from the drop-down menu. Other two pieces of information required are the MAC Address and Serial Number. For 2net based assets, enter 00:00 if information is not available
- Click on Create Device to save
#
- On the left-hand side menu, click Users > Manage Users
- On the Manage Users page, find the patient user (colored in red), and click the vertical ellipses (…) in the row for that patient
- To add a device, click on the Devices option from the drop down menu. From here you can see the current Assigned Devices and Available Devices (to assign)
- Scroll down until you see the device you want to assign (categorized by Name, Device Type, Mac Address and Serial Number). Click on the Assign Device button highlighted in lime green. Once clicked, the device will be assigned
- To unassign a device, click on Unassign Device highlighted in red under the Assigned Devices section
#
First, we need to remove the asset from the patient currently assigned
- On the left-hand side menu, click Users > Manage Users
- On the Manage Users page, find the patient user (colored in red), and click the vertical ellipses (…) in the row for that patient
- Click on the Devices option from the drop down menu. From here you can see the current Assigned Devices and Available Devices (to assign)
- To remove a device, click on Unassign Device highlighted in red under the Assigned Devices section
Next, we need to assign the device to the new patient
- On the left-hand side menu, click Users > Manage Users
- On the Manage Users page, find the patient user (colored in red), and click the vertical ellipses (…) in the row for that patient
- To add a device, click on the Devices option from the drop down menu. From here you can see the current Assigned Devices and Available Devices (to assign)
- Scroll down until you see the device you want to assign (categorized by Name, Device Type, Mac Address and Serial Number). Click on the Assign Device button highlighted in lime green. Once clicked, the device will be assigned
#
- Patient must download the hLink app and hiCare Chronic apps on their cellphone or tablet device from either the App Store for IOS or Google Play Store for Android
- Provide login credentials for hLink (same as login for hiCare Chronic)
- If properly assigned, then as soon as the patient takes their readings, it will be automatically uploaded to the hLink app from which the readings will be pushed to hiCare Chronic
NOTE: Patients need to be linked to hLink to upload vital statistics. Only being logged into hiCare Chronic will not work
7. Surveys #
#
- On the left-hand side menu, click Surveys > Manage Surveys
- On the Manage Surveys page, click + Create Survey on the top right. There will be four steps from here, including Create a New Survey, Add Questions to Survey, Setup Survey Triggers and Review & Publish.
- In the Create a New Survey section, you name the survey, choose who takes it (Practitioner, Patient, Nurse, or Caretaker and choose what Organization, Care Plan, Clinical Trial or Diagnoses will take the survey. When done entering information, click Save and Continue
- In the Add Questions to Survey section, you will choose what questions the users will answer. There are five Response Types: Option (single select), Checkbox (multi-select), Ratings (on a scale), Text (comment), and Dropdown (single select). When done entering questions, click Create Survey Questions
- In the Setup Survey Triggers question, there are multiple triggers to take a survey: When Logging In, On New Signup, Daily, Weekly, One Time Only and more. Choose the appropriate triggers and click Setup Survey Triggers
- In the Review & Publish section, you can see all the questions and how they would show to the survey taker. Once the survey looks good to you, you can click Publish to save and sent out the surveys
NOTE: Once a survey is published, the Survey Questions CANNOT be changed. Please double check your questions to see if all appropriate questions have been created, for spelling, grammar, etc. The only part of the survey which can be edited after publishing a survey are the Survey Triggers
8. Education #
#
- On the left-hand side menu, click My Library > Media
- Click on + Add Media
- From here, click on the Media Type and enter information. All required fields are marked with a red asterisk
- When ready, click on Upload Document (ex. Document)
NOTE: Make sure to double check who has access to the media upload. Media may be uploaded for self, providers or patients