Overview of Providers Dashboard #
1. Patients #
Patient List Overview
#
Manually
- On the left-hand side menu, click Patients
- From the Patients page, click + Add Patient on the top right
- Enter information such as Login Details, Address Details, etc. All required fields are marked with a red asterisk
- Scroll to the bottom of the page and click Submit. The patient is now created
#
- On the left-hand side menu, click Patients
- From the Patients page, find the patient you wish to edit and click on their name under the column Patient Name
- Click on View Complete Patient Info on the right side of the screen
- From here you can update Personal Info, Contact Info, Emergency Contact Info, Address, and Other Info
#
Clinical Notes (Free Text) Method 1
- On the left-hand side menu, click Patients
- From the Patients page, find the patient you want to edit. In the same row, to the very right, click on the button which says Add Note
- On the pop-up, enter the subject and the note and click Add Note
Clinical Notes (Free Text) Method 2, Clinical Notes (Template), SOAP Notes
- On the left-hand side menu, click Patients
- From the Patients page, find the patient you want to edit. Click on the patient’s name to navigate to Patient Details.
- From Patient Details page, click on Notes
- On the right hand side of the screen, click on the type of note you want to add.
NOTE: All previous notes added to a patient (from all providers) will be shown on the Notes tab on the Patient Details screen.
#
- On the left-hand side menu, click Patients
- From the Patients page, click on the name for who you want add a manual note for
- Click on Add Manual Activity towards the top of the page
- From here, fill out fields including Select Service, Select Activity, Activity Date, Start Time, End Time, Select Participant, and Comments
NOTE: The manual activities which you can add for patients must be added to the system via the client admin. Those activities will show on the dropdown menu when clicking on Select Activity.
#
- On the left-hand side menu, click Patients
- From the Patients page, find the patient you wish to edit. Click on said patient under Patient Name column
- In the Overview tab, you can see the patients’ Health Score and Today’s Upcoming Schedule
- Facesheet is a summarised view of patient’s vitals, diagnosis, medication, patient care plans, allergies, procedures and vaccinations.
- From Vitals & Readings, you can see all readings from the devices the customer is assigned to. You have the option to see it in a chart form or numeric from either the last week, last month, last 3 months, 6 months and a year. You can add manual readings here.
- From Medications, you can see the patient’s medication adherence score (what percentage of their prescribed medications they are taking) and add new medicaitions and its schedule.
- From Surveys, you can see what surveys the patient has taken in the last 30, 90 or 365 days and you can assign surveys manually here.
- From Notes, you can see what notes have been added to the patients and by whom (Practitioner, Client Admin, Nurses, etc)and can add SOAP notes, clinical note (Free text) and clinical note (Template)
- From Encounter you can see all the successful and unsuccessful video consultation, appointment, home visit and phone call with the patient for the last 30 days, last 6 months, All past and future.
- From Health Records, you could see EMR information such as past Diagnoses, Vaccinations, Allergies, Procedures, Lab Reports, AI Playground, Implantable Devices, Problems
- From Care Management conatins all the plans assigned to a patient and you can create new care plan manually or with AI. You can also see the care activity history.
- From More, you can see the patient’s Care Plan, Consent Forms, Invoices, Thresholds, Patient Rules, Care Circle, Patient Alerts, Programs, Attachments, Pillbox Reload History, App activities, Location/Group, insurances and ADT Records.
#
For audit purposes, patient records may not be deleted. Instead, they can be Inactivated
- On the left-hand side menu, click Patients
- From the Patients page, find the patient you wish to edit. Click on said patient under Patient Name column
- Directly parallel to the right of Patient Details, there will be a toggle switch labelled as Status (Active). Click on the toggle and there will be a warning asking if you are sure that you want to Inactivate the patient. Click “Yes” and patient will be Inactivated
#
- On the left-hand side menu, click Patients
- From the Patients page, find the patient you wish to edit or on the top you can switch between active and inactive patients, Select inactive. Click on the patient under Name column
- Directly parallel to the right of Patient Details, there will be a toggle switch labelled as Status (Inactive). Click on the toggle and the patient will be reactivated
#
Ex. Diagnoses
- On the left-hand side menu, click Patients
- From the Patients page, find the patient you wish to edit. Click on said patient under Patient Name column
- Click on the section which says Health Records > Diagnoses
- Find the diagnoses you want to assign the patient under Available Diagnoses. Simply click Add Diagnoses in the lime green box to assign that diagnoses to the patient
#
- On the left-hand side menu, click Patients
- From the Patients page, find the patient for whom you want to add a program. Click on the said patient under Patient Name column.
- Click on the section which says More > Programs. Click on Enroll
- Fill out fields including Program Name, Patient’s Enrollment Date, Patient’s Start Date, Patient’s End Date, Consent Form, and all relevant Diagnoses.
- Once filled out, click on Enroll Patient to Program
NOTE: This is the same process to enroll patients to other programs such as CCM, PCM and APCM etc.
2. Vitals #
#
Thresholds can be setup from a provider (Practitioner, Nurse) level or from the patient level. The settings at the provider level will be applied to all patients under the specific branch. The patient level will be for that specific patient.
Provider Level
- On the left-hand side menu, click Patients
- From the Patients page, find the patient for whom you want to set up threshold. Click on the said patient under Patient Name column.
- Click on the section which says More > Thresholds
- From here you can choose thresholds for various vital reading from Temperature, Pulse Rate, Blood Glucose, Weight, etc. Enter your LL (low-low), L (low), H (high) and HH (high-high) levels for each of the vitals you are tracking. If a patient goes above a HH reading or below a LL reading, then the reading will be alerted and coloured as red. If a patient goes above a H reading but not above HH, the reading will be alerted and coloured yellow.
- When done entering information, scroll down to click on Update Threshold to save settings
#
- On the left-hand side menu, click Patients
- Click on the name of the patient for who you want to acknowledge or delete an alert for
- Click on Vitals section. From here, the critically alerted alerts will show in bright red on the right side of the patient’s devices.
- Click on the name of the device which you want to acknowledge or alert
- Scroll down to where you the readings. Under the column which states Action, click on Add Note to acknowledge a reading or X to delete a reading.
- There is also an option to acknowledge all compliance alert.
NOTE: Once a critically alerted note is acknowledged, the Noted column will change from a red caution sign to a green check mark sign.
3. Devices #
#
- On the left-hand side menu, click Patients
- Click on the name of the patient for who you want to assign or unassign devices for
- Click on Vitals > Manage Devices
- The Assigned Devices and Medical Kits section will show all the devices the patient is currently assigned to. You can Unassign a particular device or devices by clicking on the Unassign button under the column Action.
- If you scroll down, you can see all available devices under the Available Devices and Medical Kits section. To assign any of these devices, click on the Assign button under the column Action.
NOTE: The client admin must add all devices to the system before a provider can assign or unassign them.
#
- On the left-hand side menu, click Patients
- From the Patients page, find the patient you wish to edit. Click on said patient under Patient Name column
- Click on Medications to + Add Medication on right side of screen
- From here you enter the “Start Date”, “End Date”, “Medication Name”, “Dosage”, “Medication Route”, “Select Time Slots” and “Quantity”
- Once done, you may click Add Medication & Close or Save & Add More Medications to add more medications
NOTE: To edit information of a patient’s medication, click on the medication listed under the patient’s account. The Edit Medication page will be displayed where relevant information can be edited.
To regularly monitor patient’s adherence, click on the dropdown arrow beside each listed medication and the system will display the date, time and whether it was taken or missed. No data indicates that the pill box had not been refilled at those times.
Each missed medication will trigger an alert. After reviewing the patient’s progress, the nurse or care manager can acknowledge the missed medication by clicking on the Acknowledge or Acknowledge All Missed Medications button.
#
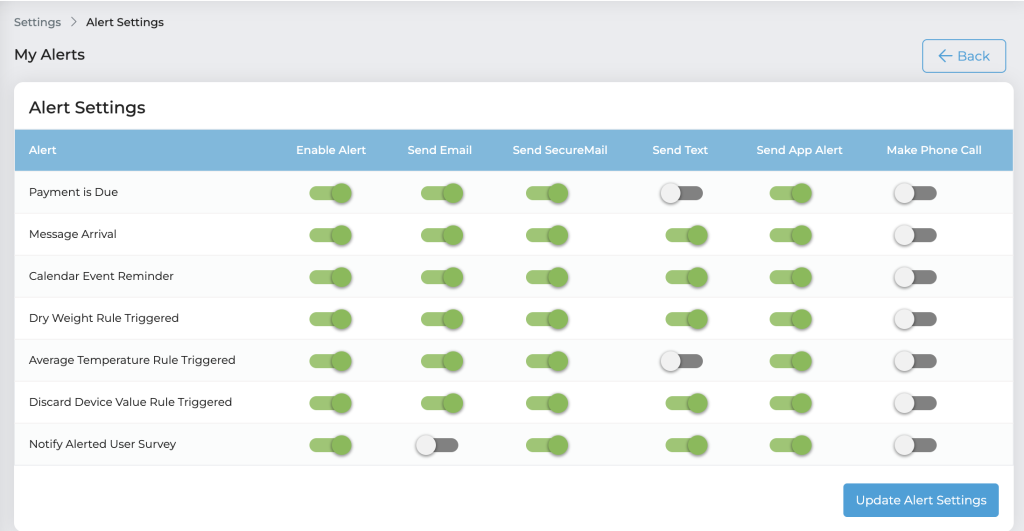
As a provider, you can receive notifications on the hiCare Chronic website, Email, SecureMail, Text, App Alert, Voice Alerts, or Phone Call. To setup notifications…
- On the left-hand side menu, click on Settings > My Alert Settings
- From here, you can adjust settings for various elements such as surveys, payments, thresholds, missed medications, appointment reminders and more
- To enable an alert, simply click on the tab corresponding with what alert you are looking to enable and what type of notification you would like to receive
NOTE: Enabled alerts will be highlighted in green. Disabled alerts are shown in grey.
4. Appointment Scheduling #
#
- On the left-hand side menu, click Schedule > Manage My Time Slots
- From Month, narrow down to week by clicking on any date in the week you want to setup
- There is a button on top “Add time slots” when you click on it a pop up will appear. Enter start time, end time, practioners locations and appointment duration. Click on save and the appointment will be set for that date and time.
NOTE: Once appointment availability is set, customers may schedule appointments in any of the time slots available. A popup will show 30 minutes before any meeting at the top of the screen.
#
15 minutes before your video consultation, a blue bar will pop up at the top of your Dashboard. Click on the Join Now button in lime green on the right-hand side of the blue bar to join the video consultation when you are ready.
NOTE: The left-hand side of the blue bar will show the subject and who is attending the video consultation. For features and functionality of the video consultation, please watch the video below.
#
- On the left-hand side menu, click Consult Now
- Follow Step 1 by entering First and Last Name
- For step 2, you have the option to charge for the consultation by clicking “Credit Card Payment Required”, then click Generate Consultation Link
- In step 3, you could send the link through either the patient’s email or text
- Finally in step 4, click Join Consultation at the appropriate time
#
As a provider, you can see your schedule from the dashboard. Today’s Upcoming Schedule will show in a lime green block. The Upcoming Schedule will show in a block to your right. In order to see your all of your previous schedule, follow these steps –
- On the left-hand side menu, click Schedule > All
- Underneath the All tab on the left, there is a tab called History. Click on this
- From here, you can see history. Blocks will show the Attendees, Date, Timing and Subject. You can see details by clicking View Details under the select block
5. Communications #
#
For sensitive information, we built our own HIPAA compliant email system into our ecosystem called Secure Mail. To compose an email –
- On the left-hand side menu, click My Messages > Secure Mail
- From here, you can Compose, see you Inbox, Sent Mail, etc
- Click on Compose, choose who it’s to, the subject matter and the message
- Once complete, scroll down to click on Send Message
If you want to send out a Chat or Text, the process is nearly identical. Instead of going to My Messages > Secure Mail, go to Messages > Text or Messages > Chat. Find the patient and your previous chat or text history will show. Simply enter in your message and click Send.
NOTE: Chats stay in the platform. Texts will stay in the platform and will send to the mobile device as well.
#
There are two ways to send out a phone call to a patient. First method –
- On the left-hand side menu, click Patients
- Find the patient you want to call. In the same row, it will show their phone number under the column Mobile.
- Click the phone icon next to their phone number, then click Call
Second Method
- On the left-hand side menu, click My Messages > Phone Calls
- There will be a Mobile Number, Office Number and Home options
- Click on phone icon and then click Call
6. Education #
#
- On the left-hand side menu, click My Library > Media
- Click on + Add Media
- From here, click on the Media Type and enter information. All required fields are marked with a red asterisk
- When ready, click on Upload Document (ex. Document)
NOTE: Make sure to double check who has access to the media upload. Media may be uploaded for self, providers or patients